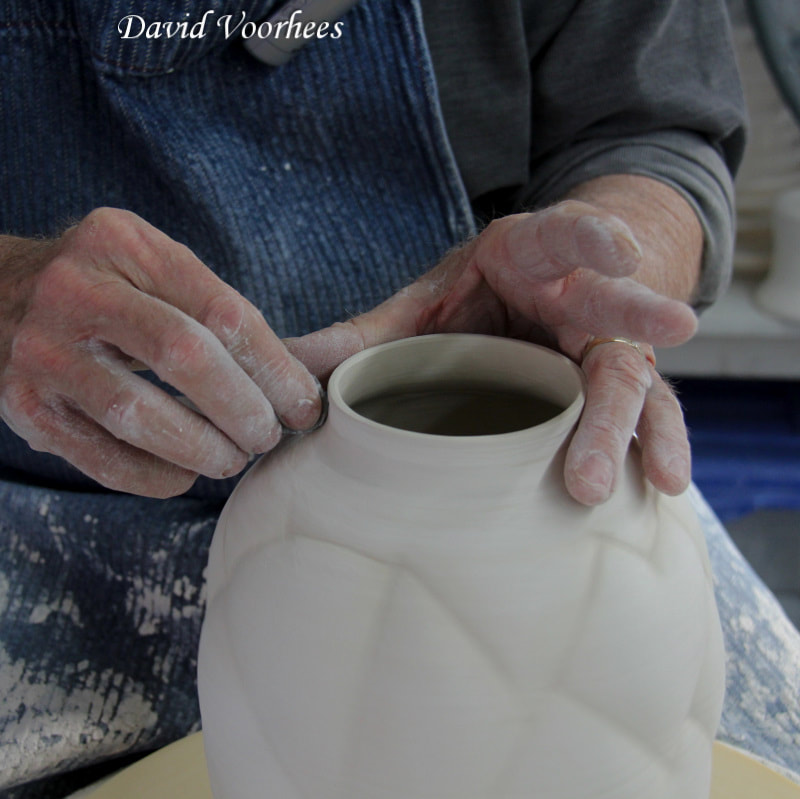
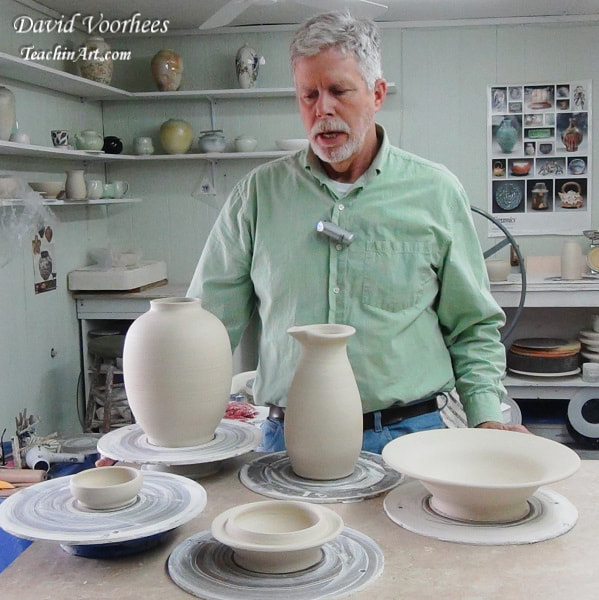
TeachinArt.com
  • Home
  • Online workshops
    • Understanding Porcelain
    • Handbuilding classes >
      • Porcelain handbuilding
      • Colored clay
      • Handbuilding Pottery For Beginners
    • Wheel thrown classes >
      • Porcelain Tips for Wheel Pottery
      • Take throwing to the next level
    • Teapot classes >
      • Pinching Teapots for Beginners
      • Faceted Teapot set
      • Wheel thrown teapots
    • Dinnerware classes >
      • Wheel thrown porcelain dinnerware
      • Handbuilding porcelain dinnerware
    • Glazing & Firing >
      • Shino glazing
      • Glazing made easy
      • Alternative firing
      • Glazing with Ron Roy
    • Painting on clay >
      • China painting
      • Post-fired finishes
    • All Artists Making A Living (AAMAL) >
      • Success stories
    • Woodworking classes >
      • Introduction to segmenting
    • Preview E-courses
  • Instructors
    • Antoinette Badenhorst
    • David Voorhees
    • Marcia Selsor
    • Connie Christensen
    • Nan Rothwell
    • Lynn Barnwell
    • Marie EvB Gibbons
    • Paul Lewing
    • Curtis Benzle
    • Robert Rundquist
    • Ron Roy
  • Registered students
  • Contact us
    • About us
  • Tips / demos
  • Students work
  • Blog

Tips for throwing cylinders and bowls

2/8/2020

2 Comments


Wheel throwing tips from David Voorhees

David Voorhees is a functional potter from North Carolina with over 40 years experience in ceramics. He is the instructor of the online workshop Porcelain Tips For Wheel Pottery at TeachinArt.
Several potters have problems with opening and pulling up consistent cylinders or bowl forms. Some of the problems are uneven walls with too much thickness at the bottom, uneven rims, and slumping clay.
Picture
David shows how to throw a porcelain urn.
Picture
David in the recording studio of TeachinArt.
These are all common problems associated with skill development and learning to use porcelain on the wheel. Porcelain does require a bit more of us as craftsmen. It needs to be prepared better and we need to limit the amount of time it is allowed to be fully wet during forming.
Here are my suggestions for those experiencing these common problems:
  • Wedge well, but don’t dry the clay out too much. Keep it covered! (see how to do Spiral wedging, as well as the Bulls head wedging)
  • Center the best you can, using enough water to keep the clay uniformly slippery.
  • Move directly into opening and compressing the bottom.
  • For cylinders, make a pronounced corner on the inside.
  • First pull; aim for uniform thickness with slight taper. Don’t worry about an uneven rim as the clay is being further centered with the wall pulling.
  • Second pull: raise the clay most of the way, you likely will double the height with this pull. Again, aim for a slight taper in wall thickness. If your rim is uneven, trim it now with a needle tool and round and smooth.
  • Continue to raise and shape but use less water as it gets thinner. This stage is where ribs and sponges help. Try wet trimming the “skirt” of clay on the outside base before using ribs.
  • Work in a series to build skills: 6 cylinders or bowl of the same size and shape or several bowls with each slightly larger (weigh them out). As you advance you can throw to a pointer stick. A chopstick in a wad of clay works well. When you have a form that you like, set the pointer ¼” off of the rim. Then work toward making the other like the model pot. Later, you can take weights and measurements so that you know how to produce consistent items. I use 420 grams of clay to make mugs thrown to 4 ¼” tall by 3 ¾” wide at the rim.
  • Work toward following a step-by-step procedure as you work on a series of pots.  Ask yourself what is working and what is not,  then repeat the successful sequence and eliminate the steps that don’t help you. The more that you can develop your own sequence for forming an item like a mug, the quicker that you will make them. This will lessen the stress on the clay.
  • As you master the smaller items like mugs, then you can extend your size range or complexity range. An advanced series may be something like a set of dinner plates, a graduated canister set with lids or a tea set.  Most of the skills that you need will be served by mastering the basic elements that I am covering in my online workshop Porcelain Tips For Wheel Pottery.

Links:
Online workshops at TeachinArt
Art instructors at TeachinArt
Preview the e-courses presented at the art school
Demonstrations & tips by our instructors and other artists and crafter's
Tags:
#potterytips #wheelthrown #wheelthrownporcelain #wheelthrowingtips #ceramicschool #teachinart #wedgingclay #wedging
2 Comments
Tex Hooper link
1/27/2023 05:57:01 pm

I didn't know that you could make clay bowls in different styles. My wife wants some unique bowls. I'll have to consider getting some custom-ordered ones.

Reply
David Voorhees link
2/6/2023 10:19:05 am

Tex,
The wonderful capacity of clay is that there are endless possibilities for what can be made. Here is a wonderful contemporary book available about ceramic bowls and the artists who made them: 500 Bowls: Contemporary Explorations of a Timeless Design It is widely available and probably at your library. This book is part of a "500" series. I am included in 500 Teapots (second edition).
Have fun finding the bowls that you want to collect!
Cheers,
David Voorhees

Reply

Your comment will be posted after it is approved.


Leave a Reply.

    Author

    TeachinArt is an online art school with professional artists as instructors who educate, enridge and promote art.

    Archives

    March 2022
    December 2021
    March 2020
    February 2020
    January 2020
    December 2019
    November 2019
    October 2019
    September 2019
    August 2019

    Categories

    All
    Alternative Firing
    Artists
    Bone China
    Carving Clay
    Centering Clay
    Clay Sculpting
    Colored Clay
    Decorating
    Demonstrations
    Glazing
    Handbuilding
    Mixed Media
    Painting On Clay
    Paper Clay
    Pinching Clay
    Porcelain
    Pottery Glazing
    Pottery Tips
    Raku
    Slip Casting
    Soluble Salts
    South African Artist
    TeachinArt Students
    Teapots
    Trimming
    Weaving
    Wedging
    Wheel Throwing
    Woodworking Tips

    RSS Feed

Links to other pages

Home
Online workshops
Our Instructors
Registered Students
About Us
Contact Us
Tips & Demos
Behind the scenes
Student's work
FAQ
Reviews

Workshops by categories

Wheel thrown classes
Handbuilding classes
Teapot classes
Porcelain dinnerware classes
Glazing & decorating classes
Woodworking
©2020 TeachinArt
All rights reserved

Webmaster: Koos Badenhorst

  • Home
  • Online workshops
    • Understanding Porcelain
    • Handbuilding classes >
      • Porcelain handbuilding
      • Colored clay
      • Handbuilding Pottery For Beginners
    • Wheel thrown classes >
      • Porcelain Tips for Wheel Pottery
      • Take throwing to the next level
    • Teapot classes >
      • Pinching Teapots for Beginners
      • Faceted Teapot set
      • Wheel thrown teapots
    • Dinnerware classes >
      • Wheel thrown porcelain dinnerware
      • Handbuilding porcelain dinnerware
    • Glazing & Firing >
      • Shino glazing
      • Glazing made easy
      • Alternative firing
      • Glazing with Ron Roy
    • Painting on clay >
      • China painting
      • Post-fired finishes
    • All Artists Making A Living (AAMAL) >
      • Success stories
    • Woodworking classes >
      • Introduction to segmenting
    • Preview E-courses
  • Instructors
    • Antoinette Badenhorst
    • David Voorhees
    • Marcia Selsor
    • Connie Christensen
    • Nan Rothwell
    • Lynn Barnwell
    • Marie EvB Gibbons
    • Paul Lewing
    • Curtis Benzle
    • Robert Rundquist
    • Ron Roy
  • Registered students
  • Contact us
    • About us
  • Tips / demos
  • Students work
  • Blog